How to Use the ERE
Advanced Electro Reflex Energizer
Operating and learning how to use the Advanced Electro Reflex Energizer, a reflexology foot massager is easy. Just walk yourself through the following steps.
Remember, it is important for our bodies to be hydrated, so make sure you drink 4-6 oz of water before using the ERE Reflexology Foot Massager. Please make sure you are drinking clean filtered water and if you are not sure, view our article on water quality and filtration types.
Please note that all of the accessories, the plug, the remote, the leg strap and the electro pads with their cables are located in the compartment on the bottom of the machine.
Using the Foot Pads
Step 1
Plug the AC Adapter into the Receptacle located on the back of the unit and plug the other end of the AC Adapter into the wall outlet.
Step 2
Press the power button to turn the unit on. As soon as the unit is turned on, a beeping sound will be heard and all the lights on the face of the display will light up. All the lights will go out with the exception of the "Indicator" Light. Keep in mind that the remote control does not turn the machine on or off, however, once the machine is on, the remote will be fully operational.
Step 3
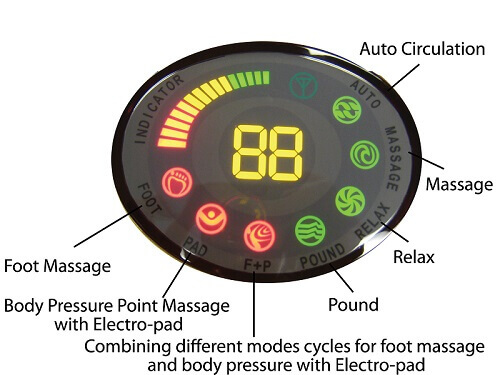
Set the "Function" of the machine. This button is located just below the face panel on the far left. You have three choices "Foot", "Pad" or F+P (meaning foot and pads). You will press the function key until the Function you want lights up.
Step 4
Set the "Mode" of the machine. The mode button is right next to the function button. You have the choice between the following four modes:
1. Mode 1 = Pounding or Pulsing
2. Mode 2 = Relaxing & Rhythm
3. Mode 3 = Massaging, Pressing, or Rubbing
4. Mode 4= Auto which rotates between all 3 modes.

I normally recommend you start with the Auto Mode and after using the Auto Mode for several days, start with Mode 1 and work your way through all the modes to determine which mode you like best. Remember, each mode works a different part of the body, view our Mode Information Sheet to view the specific areas.
Step 5
Set the "Time" for your session using the (T+) and (T-) buttons on the right hand side just below the face panel. It is best to begin with 5-15 minutes.
Step 6
Most people think the machine has turned on at this point, however, it does not begin to work until you set the "Intensity" using the arrows < or > in the center, just below the face panel. Even though the Indicator Light is ranging from "Green" to "Red", you have to set the Intensity for the machine to actually start stimulating the bottoms of your feet or hands.
In order to set the intensity, you need to hit the (>) button repeatedly until you see at least two yellow lines light up on the indicator panel. I've found that this intensity level is a good place for most people to start. If it is too much or not enough, use the less than or greater than arrow areas to adjust the intensity. Please remember that the intensity will range from low to high during its session.
Step 7
Place your bare feet on the foot pads while sitting upright in a chair. Make sure your knees are together, if necessary, use the belt. You must have both feet on the foot pads for the machine to work. If you have very dry skin, you may use slightly damp paper towels for better conductivity.
Step 8
Now that the machine is working, you will notice the "Indicator" lights go from Green to Yellow to Red, this indicates the intensity of the machine and goes through all three intensity levels during your session. If you do not feel anything or you are feeling too much when it reaches the full "red" light, remember to use the < or > buttons to adjust the "Intensity".
Using the Advanced ERE Electro Pads
You are able to use the Advanced Electro Reflex Energizer with the Foot Pads and the Electro Pads at the same time by selecting "F+P". Also, you can use the pads by themselves by selecting "Pads". It's important to just select which function you wish to use by using the Function Button.
Step 1
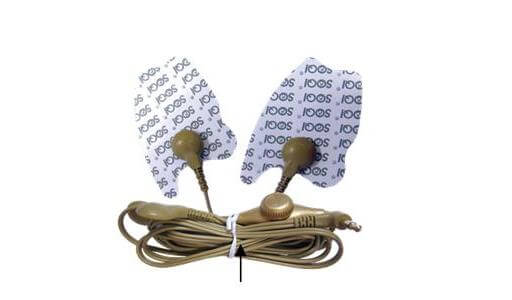
Remove the Electro Pad Cables and Electro Pads from the compartment on the bottom of the machine.
Step 2
Plug the Electro Pad Cable into one of the receptacles mounted on the side of the main unit. You can plug in just one of the Gold Electrode Pad Cables or all 3 of the Cables.

Step 3
Each Electro Pad Cable connects to two Electro Pads. Separate the connecting wires on each Electro Pad Cable and connect them to the Electro Pads using the "snap".
Step 4
Make sure you set the control dial on all of the Electro Pad Cables to "off" or "all the way down" by turning the knob located on each cable counter clockwise.
Step 5
Clean the area you are going to apply the Electro Pads to with the cleanser of your choice (alcohol, silver, hydrogen peroxide) and let the area completely dry. Then peel the transparent film off the Electro-Pads and apply the Electro-Pads directly to your skin. Caution: Do not place the electro pads above your neck or jawline and do not place one electro pad on the front and back of you heart.
Step 6
Turn the machine on using the main power button and set the Function, Mode, Time, and Intensity (I usually recommend starting with two yellow lines). If you are using the "F+P" function, adjust the intensity for your feet first, then adjust the Electro Pads. If you are just using the Electro Pads, adjust each set's intensity individually. Different areas of the body are more sensitive than others.
Now you are ready to relax in a comfortable position making sure you do not pull the Electro-Pads off.
Click here to view the placement guide.
Precautions: This device should not be used if you have or use any electronic medical instruments such as implanted heart-beat regulators, artificial hearts or lungs, implanted pacemakers. Persons who are pregnant, nursing a baby, or have any medical condition should consult with their physician before using. If you have a medical condition and have a question, you should consult with your physician before using.